


I like how tiny clay meals turn familiar foods into small sculpted details you can arrange and display.
For this collection, I’ve gathered ideas ranging from little pastries and fruit to miniature comfort foods.
I enjoy how a few simple shapes and carefully chosen colors can make each tiny piece feel recognizable.
These ideas offer plenty of ways to make a miniature meal your own.
Assorted Miniature Sushi Clay Pieces

This hand-sculpted clay miniature set recreates four pieces of nigiri sushi on a small plate, including orange-striped fish, deep pink tuna, shrimp, and yellow tamago wrapped with a dark band. Tiny rice shapes and the contrasting toppings make the set recognizable, while the plate gives the miniatures a complete meal presentation.
The separate sushi shapes make this idea easy to adapt into a matching set, a single favorite topping, or a mixed plate with different colors and details. A simpler version could use smooth rice bases and just one or two larger toppings, while finer sculpted details can be added as you gain practice. The finished miniatures could be displayed as a small collectible or used as inspiration for a sushi-themed clay charm.
Strawberry Layer Cake Clay Charm

A miniature strawberry layer cake charm turns a familiar dessert into a hand-sculpted clay accessory. Its stacked golden cake and pink strawberry filling create clear stripes, while piped white frosting and a sculpted strawberry on top make the tiny design easy to recognize.
The layered shape is the main idea to save and adapt: simpler versions can use fewer cake and filling layers, with a small strawberry or other fruit as the focal detail. Try different cake and cream colors, or swap the strawberry for a cherry or peach to make a set of miniature dessert charms.
Miniature Pancake Stack With Butter and Syrup

This hand-sculpted clay miniature recreates a stack of pancakes topped with a pat of butter and a pour of syrup. The rounded layers, toasted brown tops, and amber syrup make the tiny food sculpture easy to recognize, while the blue-patterned plate adds a simple decorative detail.
The pancake shapes and toppings can be adjusted to create different stacks, such as adding a few berries or changing the syrup color. For a simpler version, sculpt three plain round layers and add just a small butter piece, making it a manageable miniature sculpture for a tiny-food collection.
Miniature Golden Croissants

Hand-sculpted clay croissants make a realistic miniature food project, with curved crescent shapes and raised pastry folds creating the look of layered dough. Warm golden-brown color on the ridges and ends helps define the details and makes each tiny sculpture recognizable.
The folded contours do most of the work, so a simpler version can use a basic crescent shape with just a few shallow lines. Try lighter or deeper browns for different levels of toasting, or vary the sizes to create a tiny bakery assortment for display or as a miniature food collection.
Miniature Avocado Toast on Handmade Clay Bread

A miniature avocado toast sculpture pairs a curved green avocado slice with a small piece of textured toast, set on a handmade clay plate shaped like a slice of bread. The layered bread tones and tiny pale toppings make the food design readable at a small scale, while the uneven contours keep it looking hand-sculpted rather than mass-produced.
The avocado shape is the easiest detail to adapt: try a whole slice, a fan of smaller pieces, or a mashed topping, then change the bread and plate colors to suit your own miniature meal. Simplifying the surface texture and using just a few tiny toppings can make the concept manageable, while a finished piece could join a tiny-food collection or be adapted into a decorative magnet.
Miniature Pepperoni Pizza Slice

A hand-sculpted clay pizza slice turns a familiar meal into a detailed miniature sculpture. Its triangular shape, raised crust, and small pepperoni, olive, basil, cheese, and sauce details make the toppings easy to recognize at a tiny scale.
The layered toppings make the design memorable, and you could simplify them by using fewer pieces or choosing just two colors for the toppings. Try changing the arrangement or adding mushrooms and peppers to make a different version, or scale the slice down to use as a decorative miniature or charm.
Miniature Clay Noodle Bowl With Egg and Peas

This hand-sculpted clay miniature recreates a bowl of noodles topped with a halved egg and green peas, with tiny chopsticks resting across the rim. The coiled noodle shapes and contrasting cream, golden, and green colors make the small food sculpture easy to recognize, while the painted bowl adds another layer of detail.
The noodle strands give the design its main visual interest, so a simpler version could use fewer, thicker coils and just one or two toppings. You could change the garnish or bowl pattern to make a set of different miniature meals, or scale the bowl up into a small display piece; it’s a specific food scene worth saving for a miniature clay collection.
Assorted Miniature Clay Donuts

These hand-sculpted clay donuts are miniature food sculptures, with ring-shaped forms decorated as chocolate, pink-frosted, and sugar-coated varieties. The contrasting toppings and small sprinkles make each donut easy to distinguish while keeping the set recognizable as tiny bakery treats.
The simple round shapes make this idea adaptable to different sizes and flavors, such as adding a plain glazed version or changing the frosting and sprinkle colors. You could display the finished miniatures as a small collectible set or adapt one donut into a decorative charm, keeping in mind that it is for display rather than eating.
Miniature Bento Box With Onigiri and Broccoli

This miniature clay bento combines a wrapped rice ball, a rolled yellow omelet, and textured broccoli in a divided lunch box. The contrast between the white rice, dark seaweed, and bright green vegetables makes each tiny food item easy to recognize, while the handmade contours keep the set looking like a sculpted miniature meal.
The divided box gives the pieces a clear arrangement, so you could adapt the idea with other miniature sides or change the colors and fillings. For a simpler version, make just the rice ball and one side dish, or sculpt the foods separately for a tiny display or collectible set.
Miniature Mint Soft-Serve Ice Cream Cone

This miniature clay food sculpture recreates a soft-serve cone with a pale mint-green swirl above a small, textured waffle cone. Its curved ridges and tapered shape make the familiar dessert recognizable at a tiny scale, so it fits naturally into a collection of miniature food sculptures.
The swirl is the main feature, and a beginner could simplify it into a few rounded coils while keeping the cone small and the color contrast clear. Try other ice cream shades or make several cones with different swirl shapes for a playful miniature display or a small handmade gift.
Miniature Clay Fruit Bowl

A tiny hand-sculpted bowl filled with an apple, pear, and bunch of purple grapes makes a miniature fruit arrangement with clear, simple shapes. The contrasting red, yellow-green, and purple colors help each piece stand out, while the uneven contours keep the display looking handmade. It fits well as a decorative miniature sculpture for a tiny meal collection.
The fruit shapes are easy to adapt by changing the colors or swapping in miniature oranges, berries, or bananas. Beginners could start with the rounded apple and grapes, then add the pear and small stem details, or make the bowl and fruit larger for a more prominent display.
Miniature Clay Ham and Cheese Sandwich

This miniature sandwich charm recreates a simple lunch with sculpted bread, lettuce, ham, and a slice of cheese layered between the pieces. Its familiar ingredients and contrasting colors make the tiny clay food easy to recognize, while the attached metal ring turns it into a keychain-style accessory.
The layered filling gives the design its visual interest, and the idea can be adapted with different bread shapes or fillings such as tomato and cucumber. For a simpler version, use fewer layers and keep the bread and filling shapes broad; making several variations would also create a fun set of miniature food charms.
Miniature Clay Soup Dumplings

These hand-sculpted clay soup dumplings use rounded dough forms and gathered folds at the top to make a familiar tiny-meal subject recognizable. Their pale, simple coloring keeps attention on the pleated shapes, making them a miniature food sculpture rather than a functional dish.
The gathered tops are the main detail to focus on, and you could vary the number and depth of the folds to give each dumpling a different look. A beginner could start with smooth rounded forms and add just a few broad creases, while smaller versions could become charms or part of a miniature meal display.
Pastel Miniature Macaron Stack

This hand-sculpted clay miniature recreates three macarons stacked in pink, pale green, and lavender, with rounded shells and textured filling edges that make the tiny pastries recognizable. The pastel colors and repeated sandwich shape suit it as a miniature food sculpture for a tiny-meal collection.
The stacked arrangement gives the design height while keeping the forms simple enough to adapt into a single macaron or a shorter stack. You could vary the shell colors and filling shades, or make several small stacks as decorative miniatures or a playful handmade gift.
Miniature Carrot and Cucumber Platter With Herb Dip
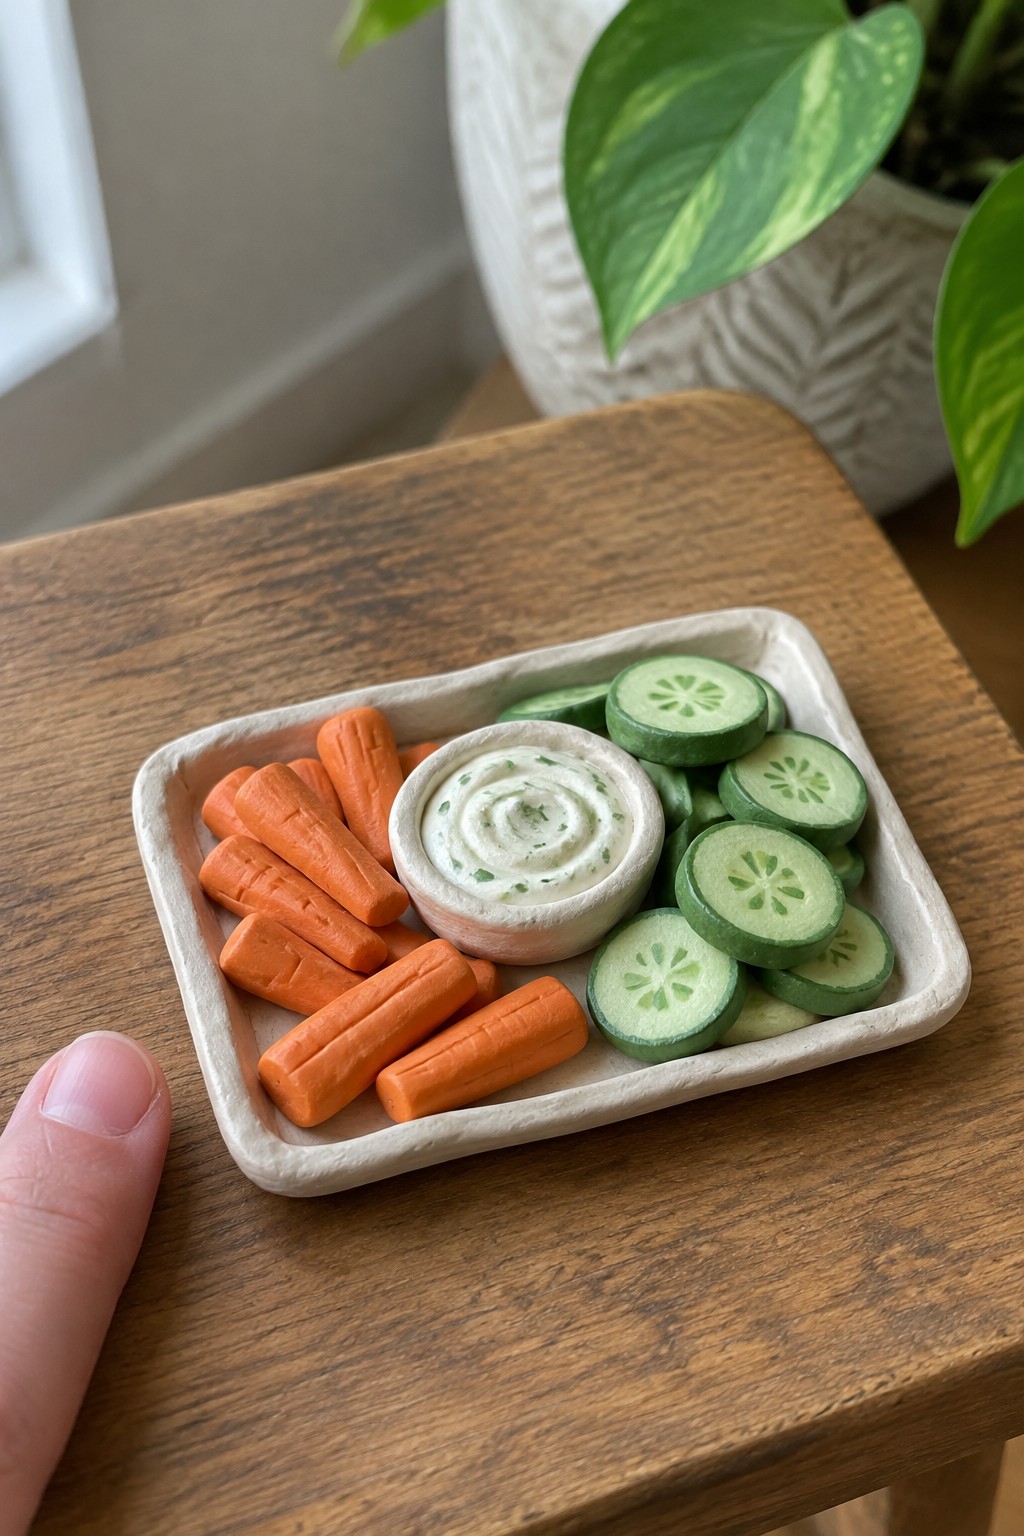
A tiny clay vegetable platter pairs orange carrot pieces and green cucumber rounds with a bowl of creamy herb dip. The handmade contours and contrasting colors make this miniature food sculpture easy to read, while the dip bowl gives the arrangement a clear center.
The small scale makes the snack-board idea easy to adapt into a simpler set of a few vegetable pieces and a small dip bowl. You could vary the vegetables or arrange them in a different color pattern, making it a distinctive miniature display or a playful addition to a tiny meal collection.
Miniature Grilled Cheese Sandwich

A tiny grilled cheese sandwich is a miniature food sculpture built around two browned bread slices and a bright yellow cheese layer. The toasted stripes and handmade bread contours make the familiar shape easy to recognize at a small scale, while the slight cheese drip adds a distinct detail. It fits naturally among realistic miniature clay food pieces.
The contrast between the golden bread and vivid cheese makes this idea easy to adapt with different toast marks or cheese colors. For a simpler version, keep the bread shapes basic and add just a few painted grill lines; a smaller sandwich could also become part of a tiny lunch scene or food-themed display.
Frequently Asked Questions
Polymer clay is a popular choice because it stays workable until you bake it, making it great for tiny details. You’ll also want a craft knife, a needle or toothpick for texture, a small rolling pin, and a clean work surface. For finishing touches, use chalk pastels or acrylic paint for color, plus a suitable glaze if you want a glossy finish. Always follow the clay manufacturer’s instructions, and don’t use food-preparation tools with clay.
Build realism with small details and natural variation. Add tiny grooves to bread, uneven edges to cookies, dimples to fruit, and subtle layers to sandwiches or cakes. Blend colors rather than relying on one flat shade, and use a reference photo to get the proportions and colors right. A light dusting of pastel can add toasted, baked, or browned effects.
Start with simple shapes such as cookies, donuts, fruit, fried eggs, or a basic sandwich. These are forgiving projects that let you practice shaping, layering, and adding texture without needing many tiny components. Once you’re comfortable, try more detailed ideas such as layered cake, sushi, burgers, or miniature pastries.
The right size depends on how you’ll use it. For dollhouse meals, match the scale of your dolls and dishes. For jewelry or charms, make the food large enough to show its details but small and light enough to wear. If you’re unsure, make a quick sample and compare it with the accessories or setting before making the full set.
Bake polymer clay according to the brand’s package directions, using an oven thermometer if you have one to check the temperature. Avoid overheating the clay, and ventilate the area as recommended by the manufacturer. After it cools, apply a compatible glaze only if the finish calls for it. Store finished miniatures in a dry container away from direct sunlight and heat, and remember that decorative clay food is not edible.
