


I like how a little piece of clay can become a tiny animal with just a few simple shapes and details.
For this collection, I’ve gathered beginner-friendly ideas that make it easy to explore different creatures, colors, and expressions.
Some are sweet as small decorations, while others could make thoughtful handmade gifts.
I hope you find a few little figures here that you’d enjoy shaping yourself.
Sleeping Fox Curled Into Its Tail

A tiny hand-sculpted fox figurine curls its orange body around its face, using its large tail as part of the compact shape. Cream markings on the face and tail, dark ear tips, and simple closed eyes make the miniature animal easy to recognize without adding many small details.
The curled silhouette is what makes this fox especially memorable, and it could be adapted with different fur colors, tail patterns, or facial expressions. For a simpler version, keep the body and tail as broad rounded forms and use just a few small details for the ears, muzzle, and eyes. Making foxes in different poses or sizes would also suit a small collection of decorative animal figures.
Three Painted Clay Turtle Wall Figures

These hand-sculpted clay turtles are small animal figures made for decorative display on a wall. Their rounded shells, simple raised legs, and painted shell patterns make the familiar turtle shape easy to recognize, while the teal, golden yellow, and rust colors help each figure stand out.
The simple body shapes make the design adaptable: beginners could use a plain shell pattern and just a few painted details, then try different colors or shell markings for each turtle. Make them as individual decorations or create a small group in varied sizes; the same sculpted turtle idea could also be adapted into a tabletop figurine.
Blue-and-Cream Bird-Shaped Clay Trinket Dish

A hand-sculpted bird forms the rim of this shallow clay trinket dish, with a raised head at one end and a tail that curves up at the other. Its blue-and-cream color blocking, small painted spots, and simple eye make the animal shape easy to recognize while keeping the dish itself useful for holding small items as a decorative accessory.
The bird silhouette is the main design feature, so a simpler version could use a rounded bowl with just a small sculpted head and tail. Try different color combinations or spot patterns, or make the dish in a smaller size for rings and other tiny keepsakes; it should be treated as decorative rather than for serving food.
Gray Cat Clay Charm

This hand-sculpted clay cat is a small animal figurine designed as a hanging charm, with a metal loop attached above its curled tail. Its gray body, pink inner ears and nose, white chest, and large green eyes make the face easy to read at a miniature scale.
The rounded body and simple color blocks give you a clear shape to work from, while the eyes and tail provide the main details. For a simpler version, use fewer facial details or choose a different eye color; you could also make the cat larger as a decorative figurine or change the animal while keeping the hanging-loop idea.
Tiny Hedgehog Pencil Topper

A hand-sculpted clay hedgehog turns an ordinary pencil into a small animal figurine, with a rounded brown body, pale face, dark eyes, and a raised nose. Short textured marks across its back create a clear contrast with the smooth face and help the miniature read as a hedgehog.
The pencil-topper format keeps the figure compact, and the simple face makes it easy to adapt with different expressions or nose colors. For a simpler version, use fewer marks for the spines, or make several hedgehogs with varied brown and cream tones as small handmade gifts or desk decorations.
Tiny Blue Whale Clay Charm

This hand-sculpted clay charm takes the shape of a rounded blue whale, with a pale blue underside, a small white eye, a side fin, and a raised tail. Its simple color blocking and soft, handmade contours make the animal easy to recognize at a miniature scale, while the hole near the head gives it a hanging-charm form.
The whale’s basic silhouette is easy to adapt by changing the body color, belly shade, or tail shape, and the eye can be simplified to a small dot. You could make a set of sea animals at the same scale for matching charms or keep the whale slightly larger as a decorative hanging piece.
Sage Green Clay Snail With a Spiral Shell

This hand-sculpted clay snail is a small animal figurine, with a pale green body and a raised terracotta-colored shell marked by a deep spiral. The simple forms and contrasting colors make the shell pattern the main detail, while the handmade contours keep the figure visibly sculptural.
The spiral shell gives the design a clear focal point without requiring many small features, so a beginner could simplify it to a rounded body, two eye stalks, and a coiled shell. Try different body and shell colors, or make the snail larger or smaller as a decorative miniature or gift.
Tiny Clay Mouse With a Cheese Wedge

This miniature clay figurine pairs a rounded cream-colored mouse with a yellow cheese wedge on a small green base. Its curled tail, simple dot eyes, pink nose, and punched cheese holes make the animal-and-food concept easy to read without adding many details.
The rounded body and small facial features keep the design approachable, while the cheese gives it a clear detail to build around. A simpler version could use fewer cheese holes and a shorter tail, or you could vary the mouse and cheese colors to make a set of small decorative animal sculptures.
Green Frog Clay Magnets

These hand-sculpted frog magnets turn a simple rounded animal figure into a small decorative accent for a refrigerator or magnetic board. Raised eyes, pink cheeks, tiny feet, and painted smiles give each frog its own clear silhouette, while the muted green and coral colors keep the details easy to read.
The rounded body can be built from a few basic shapes, so a simpler version could use flat eyes and feet with fewer sculpted details. Try changing the cheek color or making several frogs in different sizes, and add a magnet to the back if you want to use them as decorative fridge accents.
Standing and Seated Clay Penguins

These hand-sculpted clay penguins are miniature animal figurines, with rounded black bodies, white bellies, orange beaks and feet, and small pink cheeks. Their simple color blocks and oversized features make the penguin shape easy to recognize without adding many fine details.
The design could be adapted into a matching pair or a small group by changing the penguins’ poses, sizes, or cheek colors. For a simpler version, use a single rounded body and keep the beak, eyes, and feet as the main sculpted details.
Gray Bunny Clay Ring Holder

This hand-sculpted clay bunny ring holder pairs a tapered body with long upright ears, giving it a simple animal silhouette that can display rings around its neck. Its soft gray finish, small painted face, pink cheeks, and pearl-and-gold accents make the decorative holder easy to recognize as a bunny without adding complicated features.
The broad body and tall ears do most of the sculpting work, so a simpler version could use fewer facial details or skip the decorative rings around the neck. You could change the color or add a small bow, and make the figure larger or smaller to suit the rings it will hold.
Clay Squirrel and Acorn Hanging Garland

This handmade clay ornament pairs small squirrel faces with acorns to create a woodland-themed hanging decoration. Rounded shapes, warm brown and cream colors, and simple sculpted facial details keep each figure recognizable, while the repeated squirrel-and-acorn pattern makes the strand read as one coordinated clay craft.
The repeated forms make the idea easy to adapt: a beginner could simplify the faces or make just one squirrel and acorn pair, then add other woodland shapes such as leaves or mushrooms. Varying the colors or making the pieces larger could give the hanging decoration a different look, and the individual figures could also work as separate ornaments.
Koala-Shaped Clay Wall Hook

A hand-sculpted koala face becomes a decorative wall hook, with a short wooden peg extending beneath its chin. The rounded gray silhouette, textured inner ears, and simple dark facial features make the animal easy to recognize while keeping the design compact.
The shape does most of the work, so a simpler version could use smooth ears and painted details before adding the peg. Try different animal faces or clay colors, and adjust the hook size to suit a small hanging item; this idea could also be adapted into a purely decorative wall piece without the peg.
Teal Clay Triceratops Figurine
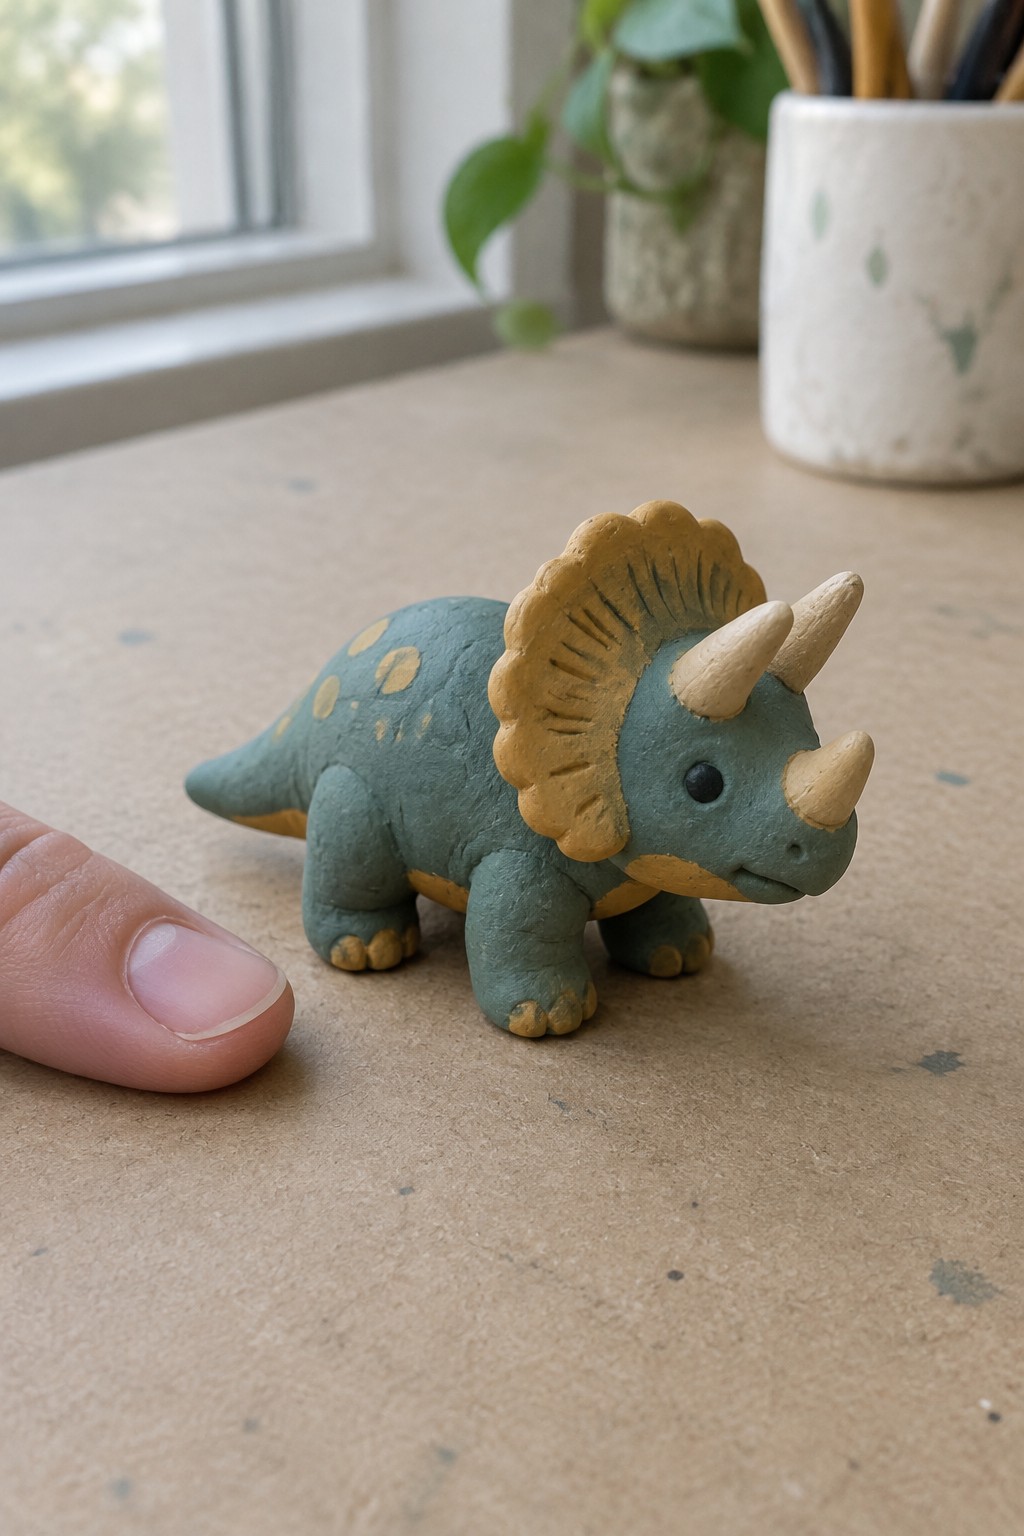
This hand-sculpted clay triceratops is a small animal figurine with a rounded teal body, ochre spots, a ridged frill, and three cream-colored horns. The contrast between the cool body color and warm sculpted details makes the dinosaur’s shape easy to recognize, while its handmade contours keep it distinct from a mass-produced toy.
The body and legs can be built from simple rounded forms, with the frill, horns, and spots added as clear details. For an easier version, use fewer spots and simplify the grooves on the frill; you could also change the colors or make a few dinosaurs in different sizes for a small collection.
Three Sitting Clay Fox Figurines

These hand-sculpted clay animal figurines form a small fox family, with one taller figure and two smaller seated foxes. Rust-orange bodies, cream-colored muzzles and chests, dark paws, and upright tails give each figure a clear fox shape, while their simple painted faces keep the details easy to read.
The family grouping is what makes the idea memorable, and you could adapt it by changing the number of foxes, their poses, or the balance of orange and cream. A beginner could start with one seated figure and use rounded body shapes, simple ears, and a painted face before trying the taller pose or adding smaller companions.
Tiny Clay Owl Earrings
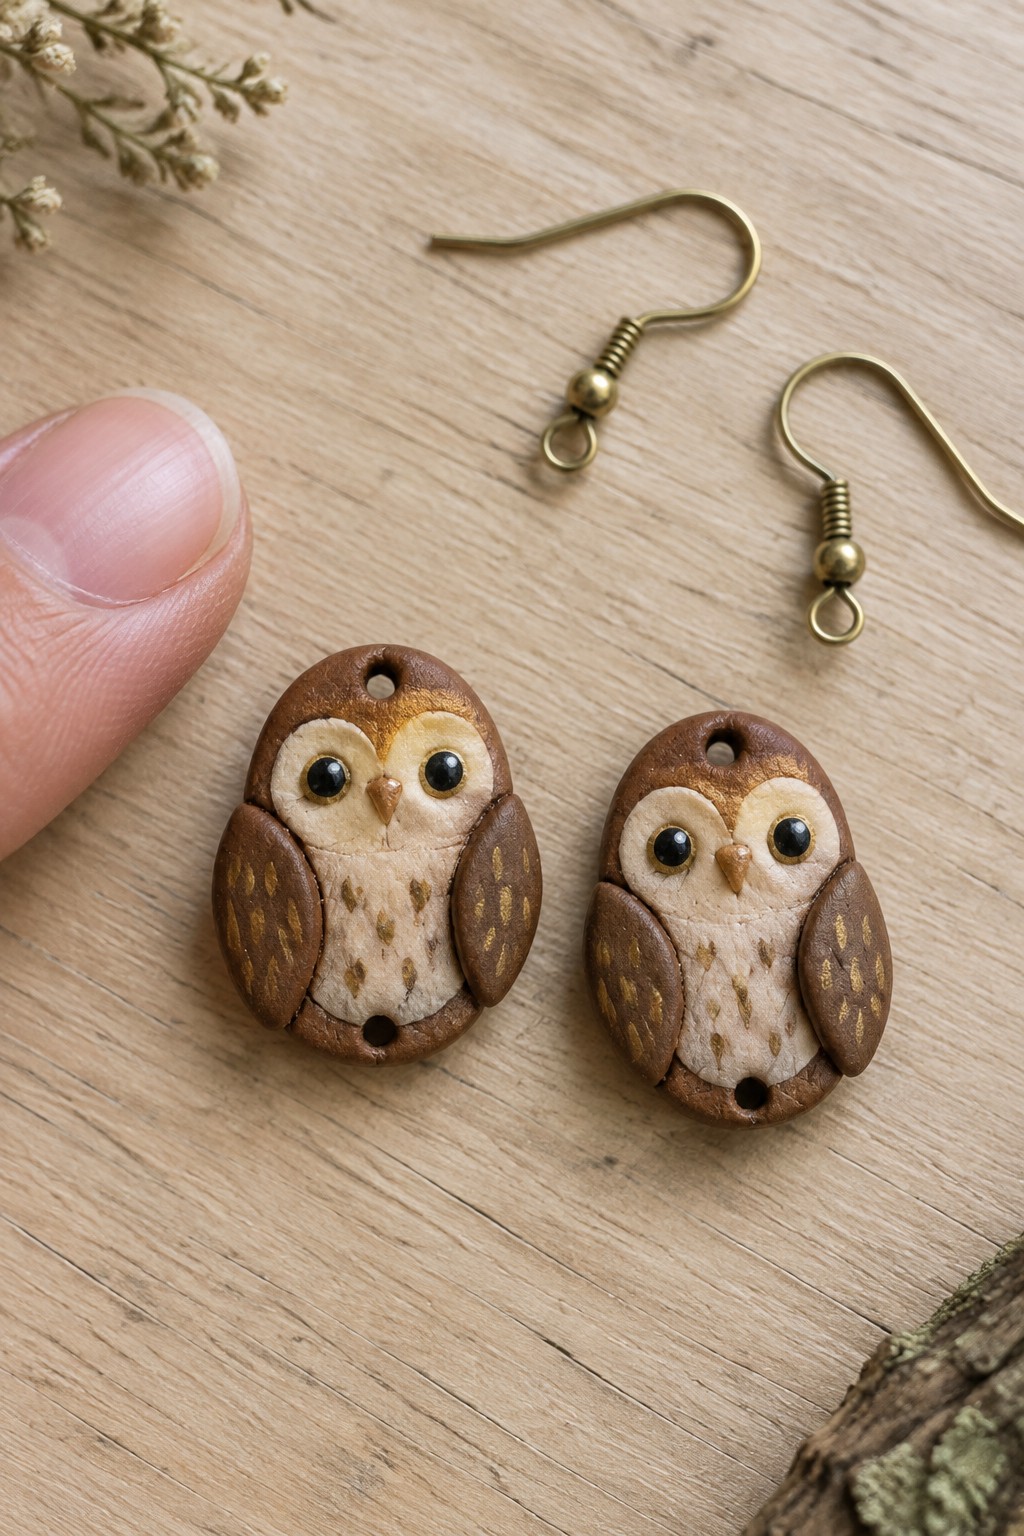
These hand-sculpted clay owl charms can be turned into a pair of earrings by attaching them to fishhook findings. Their rounded bodies, layered wings, cream-colored faces, and painted eyes make the bird easy to recognize, while the brown-and-cream palette keeps the details clear at a small scale.
The owl shape is memorable without needing a complicated scene or extra decoration, and you could simplify it with plain eyes and fewer feather markings. Try different body colors or make the owls slightly smaller or larger to suit other jewelry styles, or keep the figures as small decorative charms.
Tiny Clay Bumblebee Hair Clips

These hand-sculpted clay bees pair rounded yellow bodies with black stripes, small facial details, and white wings to create miniature animal decorations attached to hair clips. The simple, high-contrast colors make the bee shape easy to recognize at a small scale, while the handmade contours keep each clip distinct.
The rounded bodies are a manageable starting point, and beginners can keep the features simple by adding just a few stripes, dot eyes, and flat wings. Change the stripe pattern or wing shape to make a set of varied bees, or adapt the same miniature design into decorative pins or charms.
Seated Gray Clay Seal Figurine

A hand-sculpted seal figurine uses a rounded body, small front flippers, and a tapered tail to create a simple animal sculpture. Its pale gray surface and painted dark eyes, nose, and whisker spots give the face definition without adding many small details, making it a decorative clay animal figure.
The body shape does most of the work, so a simpler version could use one smooth oval form with a raised head and just a few painted facial marks. Try different gray or cream tones, or make a small group of seals in varied poses for a collectible display; the same sculpted shape could also be scaled down as a small ornament.
Frequently Asked Questions
Air-dry clay is a good choice for beginners because it hardens without an oven, while oven-bake polymer clay is ideal if you want durable figures with detailed features. Check the package instructions before starting, and avoid mixing different clay types unless the manufacturer says it’s safe.
Start with animals built from simple shapes, such as a snail, turtle, ladybug, penguin, or sleeping cat. A round body and a few small details are easier to shape than thin legs, wings, or complicated poses. Choose one idea from the list and keep the first version simple.
Join parts while the clay is still workable. Press the pieces together gently and smooth the seam with a fingertip or a clay tool. For polymer clay, a small amount of liquid polymer clay can help attach parts before baking. For air-dry clay, slightly dampen the joining surfaces, but use only a little water so the clay doesn’t become slippery or mushy.
You can begin with your hands, a toothpick, and a clean work surface. A blunt needle or toothpick can add eyes and texture, while a small plastic knife or sculpting tool helps shape details. Keep tools clean, and use ones reserved for crafting if you’re working with polymer clay.
Follow the instructions on the clay package, since drying and baking times vary by product and figure size. Let air-dry figures dry completely before painting or sealing them. Bake polymer clay at the specified temperature, and allow it to cool fully before handling. Avoid using a microwave, and don’t exceed the recommended temperature.
